Crochet Tips I Wish I Knew as a Beginner
As a beginner, most people have to suffer through learning by trial and error after error after error. It can be frustrating to the point of wanting to give up - but don’t! Luckily, we have infinite knowledge at our fingertips, and I've compiled a list of things I wish I knew as a newbie crocheter so you don’t have to make the same mistakes I did. Read below for ten ways to make your crochet journey run smoothly!
Magic circle alternative
Many crochet projects begin with a Magic Circle, which is notoriously difficult for beginners to accomplish. I spent days on my first crochet project just trying to complete the magic circle! If I’d known that there was an alternative, I could have saved myself a lot of frustration. Instead of a Magic Circle, try using the Chain 3 Method:
Make a slip knot
Chain 3
Slip stitch into the first chain
Make your stitches in the center of this circle instead of into a Magic Circle
If you still find yourself with an unwanted hole in the middle, make sure you leave a long tail before the chain. Crochet over your tail as you add stitches to your circle. When you're ready to weave in your end, pull the tail to tighten and then weave it in to secure it!
If you are determined to use a magic circle, and are still having difficulties, you can try this Magic Circle Tool to help you create the perfect magic circle!
Use a larger hook for the foundation chain
Another common way that projects are started is with a foundation chain (a string of chains that you then crochet into). A common problem for beginners is that the foundation chain is too tight, making it difficult to crochet into and causing the foundation to be smaller and less stretchy than the rest of the project. You can just crochet the chain looser, but it may be difficult to keep a consistent tension that is different than your natural one. Instead, crochet the foundation chain with a hook one size larger than the project calls for. For example, if you are using a 5mm hook for your project, use a 6mm hook for the foundation chain!
Use yarn as a stitch marker and row counter
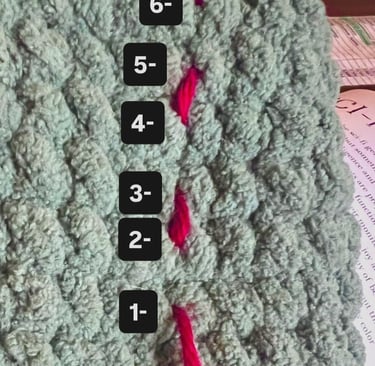
If you’re doing amigurumi, you will have to keep careful count of your stitches and rows. Sometimes, stitch markers can create gaps in your work if you're trying to create tight stiches. It can also be difficult to visually count how many rows you've completed if you are a beginner. Instead of stitch markers, I sometimes use a long piece of yarn to mark and count my rows. Just place the yarn over your work, with the stitch marker yarn going from the outside of the project to the inside, before completing the last stitch, crochet over it, and place the yarn back and forth through each row as you go! I recommend using an easily visible contrast color and a similar sized or smaller yarn to prevent gaps. This also helps keep track of rows. Just count each entry and exit point of the yarn to count how many rows you have! In the example photo below, I needed 7 rows of single crochet. You can see how the yarn helped keep track for me!